Getting Started with Custom Framing
Custom framing your Hooey Mountain art can seem like a daunting task for many, but in the end, it can be worth the extra effort. There are so many wonderful frame options out there and while sometimes we just want to go with the easiest choice, picking up a hint of red to match the skier, or adding a rustic or contemporary frame to match the room just might be the thing that gives the art the WOW factor it deserves. I offer basic frames to please "most" people, but when you custom frame, you can choose something that suits you and your space the best. For really large prints, it might make sense to have the framing done closer to where it will be hung since shipping anything over 40" can be very expensive. Whether you choose to do it yourself, go to a your local framer or work with someone online, here are some terms and tips to get you started.
Glazing
Glazing provides the physical barrier between the art and the rest of the world. It is what people typically think of as the “glass”. There are a number of different options of glass or acrylic with different pros and cons for each.
1. Basic Glass – Pretty straight forward. We all know what glass is.
Pros:
- Least expensive
- Easy to clean.
- Less likely to scratch than basic acrylic
Cons:
- Requires a spacer or mat to separate the photography from the glass.
- Can have a slight green tint to it and darkens the art.
- Basic glass has no UV protection.
- Basic glass is reflective.
- Can have slight flaws or irregularities.
- Its heavy, so with a big piece this is an important factor. The weight can sometimes put added stress on the joints, causing them to fail over time. Larger pieces can be difficult and expensive to ship with glass. Some moldings cannot handle the weight of the glass and cannot be used with this option.
- Size limitations. Some framers will not use glass over certain sizes, or will require significant strengthening of the frame, adding cost and more weight to the project.
- Should the art slip off the wall, the glass is likely to shatter, possibly damaging the art.
2. Conservation Clear Glass – Much of the same pros and cons of the basic glass described above but is a clearer glass (and not green or flawed), provides some UV protection and slightly less reflective. Art should never be hung in direct sunlight but having some UV protection will help with all fading. This option is slightly more expensive than regular glass, but still relatively inexpensive. Its a good choice for small to medium sized pieces.
3. Museum Glass – Best UV protection for glass, non-reflective, scratch-resistant, non-static. Most expensive glass option. One common brand is Art Glass.
4. Acrylics – sometimes, referred to as plexiglass, there are a wide range of acrylics out there and depending on who you talk to, they go by a number of different names with different qualities. Here are some basic facts.
Pros:
- Does not require a mat or spacers usually (see below)
- Less heavy than glass
- Great for large sizes
- Shatterproof
Cons:
- More expensive
- Care needs to be taken when cleaning to not scratch the surface on all acrylics. Best to wipe with microfiber cloths and not paper towels.
- Some are staticky, attracting dust.
5. Standard Styrene – Cheapest. Styrene will sometimes come with ready-made frames bought from places like Walmart or Amazon. Styrene is very thin, scratches very easily, sometimes has a slightly cloudy quality to it. Styrene will bow over time. If you buy a ready-made frame, consider upgrading the glazing with a framer or at your local glass shop. Remember if switching to glass, you will need spacers and best to involve a framer. If switching to a higher-grade acrylic, you may not need spacers.
6. Frame grade acrylics – There is a wide range of options here and depending on who you use for framing, you can get wildly different products. The difference tends to be in the thickness, which will ultimately affect it’s weight and if it will bow over time, and hardness which will determine if it is more likely to scratch over time. It may warp a bit on larger pieces. All frame grade acrylics have some UV protection and should be defect free, making for a very clear barrier. These are less likely to scratch than the lowest grade acrylics but will scratch over time if not careful when cleaning. Very staticky. Requires cleaning with a soft cloth only. You can reduce the static by slightly dampening the micro cloth with a small bit of water. Great for shipped frames. Also comes in a non-glare version, but that looks a bit cloudy.
7. Optimum Museum Quality Acrylic – This is the top-of-the-line choice for framing your art. Has 99% UV protection, anti-reflective, anti-static, and scratch resistant due to a hard coating. Significantly more expensive than the other acrylic and glass options. One common brand is TruView.
If I were framing a large print, I would opt for the Opti!
Spacers or Mat board
Photography should never be framed directly touching glass. If your photo is pressed against the glass, one of two things can happen: the moisture from temperature changes can seep into the paper, removing the ink or causing discoloration, or the image can adhere to the glass as the moisture dries, resulting in ripping or peeling when removed from the frame. Look around your house at older family snapshots framed behind glass and you will see what I'm talking about. I choose to use no mat for a more modern look and because my metal frames used for the skier images come with acrylic, they do not require a spacer. I have been told that cotton rag is OK to frame without a spacer.
Mats - Many people choose to use mats to separate the glass from a photo. I can not stress enough that color selection of your mat is so important. There are millions of colors to choose from including many whites. The wrong white can make the snow look yellow or grey. If you are using a white mat, I would select it in person and not off an online website. Note that a white mat under florescent lights in a frame shop can look wildly different in your home with natural light.
Mats come in different thicknesses. If I am going to use one, I like a thicker mat, like an 6-8 ply cut with a bevel to enhance the framing job.
Spacers - For a more modern look, you can skip the mat and add a “spacer” that keeps the art from touching the glass. Spacers come in a few colors, including clear, white, black and natural in various depths. Very narrow ones will be "hidden". A nice tall matte white spacer can enhance the framing by giving it a shadow box look great for floated images. Some are plastic, others are wood. Your framer can advise you on what they have and the best choice to use. Spacers are not required if using an acrylic glazing for your physical barrier.
Mounting
There are two different ways to mount art work, museum mounting and dry mounting. For small works with only sentimental value, I'll often just pop the art in a frame and forget about it. But when the art increases in size or value, it's best to mount the art.
1. Museum mountings is archival and reversible. It can be achieved with acid-free and archival materials. Museum mounts include simple photo or mounting corners or more complex methods like hinge mounting with archival tapes or tissues. Which one you use will depend on the size and value of the work. A small limited edition valuable photo, might be fine with photo corners to hold it in place, a historic document of significant value should be hinge mounted. Either way, these will likely ripple and possibly curl over time, especially if you are using glass and it is not pressed against the glass (see above info on glazing). In some cases, that is an OK and desired effect. Rippling is a result of temperature and humidity changes. If the art is in a temperature controlled environment, it will minimize rippling. If it is in a seasonal condo and the heat or AC is turned up or down when no one is using that space, you will see more rippling.
2. Dry mounting can be archival and usually non-reversible. Dry mounting is a method of setting the image on a hard backing through the use of a heat-sensitive adhesive material. For it to be archival, the barrier against the art needs to be acid free and archival. There are several materials and methods used in dry mounting and each framer will offer different solutions. The brand Mountcor offers an acid-free heat activated white foam board that I think works great. As a non-reversible method, you will not be able to remove the art from the surface it has been adhered to, but that does not mean that you can not change the frame, mat or glazing if you want a new look years later. Another reason to dry mount a piece is if your artwork has been stored in a tube for an extended time. Dry mounting will smooth out the curl in your artwork. The advantage to dry mounting is that you will not see any curling or rippling, even if the art is not pressed against the glazing.

Moldings
There are so many options here. Depending on your art, the shape and finish, your molding can really add to the art. One thing I try to avoid is distracting from the art. The frame should fade away and let the art shine. When looking at contemporary molding selections, I personally prefer the molding always be deeper than wider, or a perfect cube shape if available.
One option I really like are finished corner frames. Metropolitan Frames (metroframes.com) and Vermont Hardwoods offer beautiful finished corner options. The finished corners will not show a split line and I'm pretty sure they are guaranteed to never split. Find a framer that will order one of their frames for you and do the work to complete the frame as they are not direct to consumer.
1. Metal Frames – These are great if they fit your aesthetic. Sometimes the corners will shift if these are shipped, but that can be easily fixed with a screwdriver. In addition to basic shapes and colors, I have seen some very cool rustic metal frames offered at high-end framing establishments. Do your research and you might find a very nice option in metal.
Pros:
- Come in a variety of colors and sizes
- Can handle the weight of glass
- Will not warp over time
- Easy to care for
Cons:
- Might rust over time if hung in a damp area such as a bathroom or musty basement.
2. Wood Frames – These come in three varieties, solid natural wood, finger jointed wood or MDF (composite wood).
Solid hardwoods stained to bring out the beauty of the grain and put together with dovetail joined corners can be a stunning frame for a special piece of art. Some solid woods are stained or painted
Finger joined wood is many pieces of wood glued together to become one. They are less expensive options. In some ways they can be a stronger wood, less likely to warp, but they also risk becoming unglued. Sometimes they come “wrapped” with something to create a finish that looks like paint or fake wood to hide the joints. I personally avoid the wrapped woods that try to look like wood. They do not. They look and feel cheap. They are OK for a solid finish that looks like paint for a small piece of art. Unlike a natural wood frame that gets scratched or dented that can be touched up with paint, a wrapped frame can get a snag that is not fixable.
MDF stands for medium density fiber. It is a composite material commonly made of wood fibers and resin formed by high pressure and heat process. Think pressed sawdust. For a painted or solid color frame, this can be a great option as it is light, strong and resistant to warping or coming unglued over time. However, I would not select this from an online source. There are some that look very cheap. Best to see it in person.
Large art framed with wood will require heavier moldings, especially if using glass. You should always ask for some sort of additional bracing to strengthen the corner joints if the frame is over 18x24. This can be cross bars or a "strainer". A strainer looks like an unfinished frame inset within the mounting on the back side of the frame. It strengthens the frame and keeps the corner joints from splitting under the weight of the glass or glazing. Using a strainer will also allow you to choose a thinner molding, but needs to have the depth to fit the strainer. I prefer thin moldings with photography.
The price for wood frames is all over the place. There are many online framing options in addition to your local options that are worth exploring. Some offer just a handful of moldings in a variety of preset sizes, but a few will really work with you on something custom, like Framebridge.com. If you have a nice art supply store nearby, they often have some nice ready-made options in standard sizes if you want to take on the task yourself.
The supply-chain issues for molding has hit the framing industry hard. I did not realize most molding comes from overseas. Before beginning your selection process, ask your framer which moldings they currently have in stock or know they can easily get. This will save you a lot of wasted time. Typically, the things they have in stock tend to be less expensive.
Shadowbox with Float Mounting
This is a framing style I like to use on occasion for my photography or art. Because I present my photos in a more contemporary style, I do not add a mat. Shadowboxing dresses it up and really makes the art shine. This requires a deeper molding and is more expensive because of the time and materials involved as well as that fact that it becomes a larger size. The art will first be mounted to a slightly smaller piece of acid free foam board that provides the lift. That will then be mounted onto a mat board larger than the art. How to mount the art to the foam board depends on the size and value of the art. A framer can best advise you on this. Since the larger mat board will show, it is important that you choose a color that will enhance the art. For my skier series, I make sure the mat board makes the image pop and does not make the paper or snow look grey or yellow. The sides of the interior of the frame will need to be built up with additional mat board or spacers to hide the inside of the frame. If you choose to frame in this style, order prints on cotton rag instead of luster papers and ask me to reduce the white trim size to approx.1/2- 3/4 ” instead of the usual wide white border.

Hanging options
Regardless of which option you choose, I always add a rubber (or felt bumper) to the corners of the art. It helps keep the art from shifting and will less likely leave a scratch on the wall if the art gets bumped. Buy a packet of 24+ to have on hand for any art in your house.
Metal frames typically have a secured screwed in option to add a metal wire.
Wood frames have a few options to consider. If doing this yourself, make sure you have a wide enough molding to support that hanger and pre-drill the screw holes so you do not risk splitting the wood.
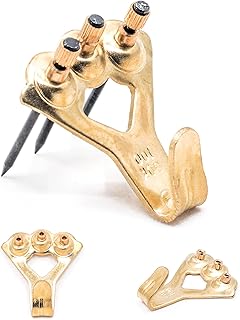
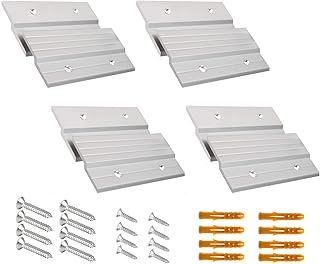
- Wall Buddies – These are a relatively new option that I really like. They come in various sizes and pairs (left and right) and work both as a self-leveling hanger and strengthener for the top two joints. They are especially great for heavy art. The only downside is they sit a little bit away from the wall, so depending on where the art is hung, it might not be desirable. An even newer product on the market is a recessed version on the Wall Buddies that would alleviate this problem. ( not that I'm looking at this photo, I think it is just flipped to the opposite side!) I have not tried this yet but want to on my next big project. Some framers offer Wall Buddies, others may not, but you can ask for them or buy them yourself and add them to the piece if your molding is wide enough.
- D rings - Two D-rings will be screwed directly to the back of molding about ¼ to 1/3 of the way down the sides. Large art pieces should be hung from the two D rings, NOT a wire. Another reason for choosing a molding that has the proper heft to it (based on the finished size) is so that the stress of the weight on the D rings will not split the wood over time.
- D rings with wire – A wire is not advisable for larger pieces framed with wood moldings. The wire adds additional stress to the D rings and can pull the D rings from the molding as well as cause additional stress on the joints. It is perfectly fine and easy to hang smaller light weight pieces using a wire.
- Saw tooth hanger – This is an acceptable option for small pieces that are not heavy. They should always be hammered or screwed directly into the molding or clipped over the backer board but never glued.
Finally, I highly recommend using something more than a nail to hang your art. If you are hanging from a wire, I recommend using two hangers to keep your art from moving around and scratching the wall. Rubber bumpers on all four corner will also help. There are many good hangers by Ook that are available at most hardware stores. They list a maximum weight for each type.
For very small lightweight works
Also in News